I wrote an article about WooCommerce Add to Cart with Ajax on Single Product Page. Due to some requests, I am going to show you how to enable users to add products to their cart on archive pages through AJAX.
WooCommerce already has the ability to add products to your cart through AJAX on archive pages. But it doesn’t update the cart contents on the header. In most of the themes, it just shows that the product has been added with a link to the cart page.
Adding Cart Icon in the header
The first step as the previous article has is to add an icon in the header which will show your cart contents after the user click on Add to Cart on archive pages.
You can pick any image of a basket/cart or any font-awesome icon to display this. You can also display the cart count, that is the number of products currently in the cart and also show the amount.
Here is the code which I have used in one of the themes that I have made to display the cart on the header.
<div class="secondary-cart">
	<?php $items = WC()->cart->get_cart();
	global $woocommerce;
	$item_count = $woocommerce->cart->cart_contents_count; ?>
	<a class="cart-totals" href="<?php echo wc_get_cart_url(); ?>" title="<?php _e( 'View your shopping cart' ); ?>">Cart (<span><?php echo $item_count; ?></span>)</a>
</div>
The icon-basket class can be used to display an icon from font-awesome or if you want, you can use an image there as well.
The cart-count-total class will contain the number of items that the user has in his/her shopping cart.
Add the necessary CSS to those classes the way you want them to look. This is how my header looks in one of the themes that I have made.

Next step is add a drop-down which will display the cart contents when people move their mouse over the cart section on the header.
<div class="secondary-cart">
	<?php $items = WC()->cart->get_cart();
	global $woocommerce;
	$item_count = $woocommerce->cart->cart_contents_count; ?>
	<a class="cart-totals" href="<?php echo wc_get_cart_url(); ?>" title="<?php _e( 'View your shopping cart' ); ?>">Cart (<span><?php echo $item_count; ?></span>)</a>
	<div class="cart-dropdown">
		<div class="cart-dropdown-inner">
			<h4>Shopping Bag</h4>
		</div>
	</div>
</div>
We will also want to display the existing cart items here so we use the following code to display that along with the cart and checkout links.
<?php $items = WC()->cart->get_cart();
	global $woocommerce;
	$item_count = $woocommerce->cart->cart_contents_count; ?>
	<a class="cart-totals" href="<?php echo wc_get_cart_url(); ?>" title="<?php _e( 'View your shopping cart' ); ?>">Cart (<span><?php echo $item_count; ?></span>)</a>
	<div class="cart-dropdown">
		<div class="cart-dropdown-inner">
			<?php if ($items) { ?>
				<h4>Shopping Bag</h4>

				<?php foreach($items as $item => $values) {
					$_product = $values['data']->post; ?>

					<div class="dropdown-cart-wrap">
						<div class="dropdown-cart-left">
							<?php echo get_the_post_thumbnail( $values['product_id'], 'thumbnail' ); ?>
						</div>

						<div class="dropdown-cart-right">
							<h5><?php echo $_product->post_title; ?></h5>
							<p><strong>Quantity:</strong> <?php echo $values['quantity']; ?></p>
							<?php global $woocommerce;
							$currency = get_woocommerce_currency_symbol();
							$price = get_post_meta( $values['product_id'], '_regular_price', true);
							$sale = get_post_meta( $values['product_id'], '_sale_price', true);
							?>

							<?php if($sale) { ?>
								<p class="price"><strong>Price:</strong> <del><?php echo $currency; echo $price; ?></del> <?php echo $currency; echo $sale; ?></p>
							<?php } elseif($price) { ?>
								<p class="price"><strong>Price:</strong> <?php echo $currency; echo $price; ?></p>
							<?php } ?>
						</div>

						<div class="clear"></div>
					</div>
				<?php } ?>

				<div class="dropdown-cart-wrap dropdown-cart-subtotal">
					<div class="dropdown-cart-left">
						<h6>Subtotal</h6>
					</div>

					<div class="dropdown-cart-right">
						<h6><?php echo WC()->cart->get_cart_total(); ?></h6>
					</div>

					<div class="clear"></div>
				</div>

				<?php $cart_url = $woocommerce->cart->get_cart_url();
				$checkout_url = $woocommerce->cart->get_checkout_url(); ?>

				<div class="dropdown-cart-wrap dropdown-cart-links">
					<div class="dropdown-cart-left dropdown-cart-link">
						<a href="<?php echo $cart_url; ?>">View Cart</a>
					</div>

					<div class="dropdown-cart-right dropdown-checkout-link">
						<a href="<?php echo $checkout_url; ?>">Checkout</a>
					</div>

					<div class="clear"></div>
				</div>
			<?php } else { ?>
				<h4>Shopping Bag</h4>

				<div class="dropdown-cart-wrap">
					<p>Your cart is empty.</p>
				</div>
			<?php } ?>
		</div>
	</div>
</div>
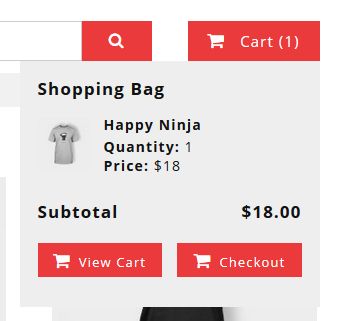
After adding the above code, add the CSS that you want to add to style this dropdown. This is how the drop down looks on the theme that I am creating this on.

Now that the header is ready. Let’s begin the WooCommerce part.
Adding JS to the WooCommerce Add to Cart Button on Single Product page
As specified above, WooCommerce AJAX add to cart on archive pages is already enabled by WooCommerce. However, all it does is add the product to cart and display a link to your cart page.
So let’s override that altogether and create our own AJAX for that button
Place the following code in your JS file of your theme. If you don’t have one (which is very unlikely to happen) or if you are using a child theme, use wp_enqueue_script() to add a JS file to your theme. Also use wp_localize_script to get the admin-AJAX.php URL in your AJAX call.
jQuery(document).ready(function() {
	jQuery('.add_to_cart_button').click(function(e) {
		e.preventDefault();

		console.log('clicked');
	});
});
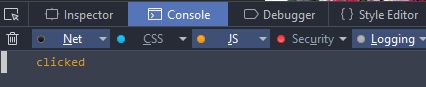
The above code will override the add to cart button on the archive pages to function and just as a test it will show a “clicked” text in the developer console of your browser. You can see the developer console on your browser by pressing the F12 button. After adding the above code, if you head over to any archive page, you will see a message in your console, something like this..
Now let’s add the AJAX call to the above JS code
jQuery(document).ready(function() {
  jQuery('.add_to_cart_button').click(function(e) {
		e.preventDefault();
		var prodID = jQuery(this).attr('data-product_id');
        jQuery(this).addClass('adding-cart');
		jQuery('.cart-dropdown-inner').empty();

		jQuery.ajax ({
            url: crispshop_ajax_object.ajax_url,
            type:'POST',
            data:'action=crispshop_add_cart&prodID=' + prodID,

            success:function(results) {
                jQuery('.cart-dropdown-inner').html(results);
                var cartcount = jQuery('.item-count').html();
                jQuery('.cart-totals span').html(cartcount);
                jQuery('.products .add_to_cart_button').removeClass('adding-cart');
                jQuery('html, body').animate({ scrollTop: 0 }, 'slow');
                jQuery('.cart-dropdown').addClass('show-dropdown');
                setTimeout(function () {
                    jQuery('.cart-dropdown').removeClass('show-dropdown');
                }, 3000);
            }
       });
	});
});
Here is a list of items that I have included in the above code.
jQuery(this).addClass(‘adding-cart’); adds the class “adding-cart” to the button clicked, so that an animation can be added to the button showing to the user that the website is adding the product to their cart.
jQuery(‘.cart-dropdown-inner’).html(results); inserts the results in the cart dropdown
var cartcount = jQuery(‘.item-count’).html(); counts the number of items in the cart to update the cart count in the header.
jQuery(‘.cart-totals span’).html(cartcount); updates the cart count in the header.
Since the product is added to the cart, jQuery(‘.products .add_to_cart_button’).removeClass(‘adding-cart’); removes the class “adding-cart” to get rid of the animation on that button which we added earlier.
jQuery(‘html, body’).animate({ scrollTop: 0 }, ‘slow’); scrolls to the top of the page.
jQuery(‘.cart-dropdown’).addClass(‘show-dropdown’); adds the class to the cart on the header to display the contents of the dropdown. You will have to add the necessary CSS to display it.
jQuery(‘.cart-dropdown’).removeClass(‘show-dropdown’); hides the dropdown after 3 seconds.
The prodID will pull in the ID of the product. ‘.empty()’ is used to empty the contents of the drop down so that we can update it with new content. The ‘crispshop_add_cart’ is the function which will add the product to the cart and then send back the cart contents to update the drop down in the header.
The PHP side
Every theme should have a functions.php file. If you are using a child theme, then use the functions.php of the child theme and paste the following code there.
Here is the code to enqueue the JavaScript files in the theme.
function crispshop_scripts() {
    if (is_shop() || is_product_category()) {
	    wp_enqueue_script( 'crispshop-archive', get_template_directory_uri() . '/js/crispshop-archive.js', array('jquery'), '1.0.0', true );
	    wp_localize_script( 'crispshop-archive', 'crispshop_ajax_object', array( 'ajax_url' => admin_url( 'admin-ajax.php' ) ) );
	}
}
add_action( 'wp_enqueue_scripts', 'crispshop_scripts' );
The following is the functionality of adding the product to the cart and then passing on the results to the AJAX success function.
function crispshop_add_cart_ajax() {
	$prodID = $_POST['prodID'];

	WC()->cart->add_to_cart($prodID);

	$items = WC()->cart->get_cart();
	global $woocommerce;
	$item_count = $woocommerce->cart->cart_contents_count; ?>

	<span class="item-count"><?php echo $item_count; ?></span>

	<h4>Shopping Bag</h4>

	<?php foreach($items as $item => $values) {
		$_product = $values['data']->post; ?>

		<div class="dropdown-cart-wrap">
			<div class="dropdown-cart-left">
				<?php echo get_the_post_thumbnail( $values['product_id'], 'thumbnail' ); ?>
			</div>

			<div class="dropdown-cart-right">
				<h5><?php echo $_product->post_title; ?></h5>
				<p><strong>Quantity:</strong> <?php echo $values['quantity']; ?></p>
				<?php global $woocommerce;
				$currency = get_woocommerce_currency_symbol();
				$price = get_post_meta( $values['product_id'], '_regular_price', true);
				$sale = get_post_meta( $values['product_id'], '_sale_price', true);
				?>

				<?php if($sale) { ?>
					<p class="price"><strong>Price:</strong> <del><?php echo $currency; echo $price; ?></del> <?php echo $currency; echo $sale; ?></p>
				<?php } elseif($price) { ?>
					<p class="price"><strong>Price:</strong> <?php echo $currency; echo $price; ?></p>
				<?php } ?>
			</div>

			<div class="clear"></div>
		</div>
	<?php } ?>

	<div class="dropdown-cart-wrap dropdown-cart-subtotal">
		<div class="dropdown-cart-left">
			<h6>Subtotal</h6>
		</div>

		<div class="dropdown-cart-right">
			<h6><?php echo WC()->cart->get_cart_total(); ?></h6>
		</div>

		<div class="clear"></div>
	</div>

	<?php $cart_url = $woocommerce->cart->get_cart_url();
	$checkout_url = $woocommerce->cart->get_checkout_url(); ?>

	<div class="dropdown-cart-wrap dropdown-cart-links">
		<div class="dropdown-cart-left dropdown-cart-link">
			<a href="<?php echo $cart_url; ?>">View Cart</a>
		</div>

		<div class="dropdown-cart-right dropdown-checkout-link">
			<a href="<?php echo $checkout_url; ?>">Checkout</a>
		</div>

		<div class="clear"></div>
	</div>

	<?php die();
}

add_action('wp_ajax_crispshop_add_cart', 'crispshop_add_cart_ajax');
add_action('wp_ajax_nopriv_crispshop_add_cart', 'crispshop_add_cart_ajax');
We fire the ‘crispshop_add_cart’ function in the functions.php file which first pulls the item which was sent to it from the AJAX function. We then add the product to the cart. Then we use the WC()->cart->get_cart() function to get the items in the cart and then create the HTML markup for the cart drop down. The above function will return the product image, title, quantity and the price of the products in the cart. In addition to that, it will also show the Subtotal (since total price is calculated after entering the shipping details) and the WooCommerce cart and checkout page links.
This is how my cart drop down looks after I added the CSS for that particular site.
You can view a demo of the above code at CrispShop which is a Free WooCommerce Theme
You can view our website at CrispThemes, where you can download Free WordPress Themes and Plugins
Feel free to comment or ask anything you want.
Hello. Awesome tutorial, however doesnt completely work for me yet…
I get an :
Uncaught ReferenceError: crispshop_ajax_object is not defined
Do i need to change the URL? Can you help me diagnose this?
Hello Huzi,
The “wp_enqueue_script” part was missing from the tutorial above. Thanks for pointing that out. I have added it back in.
Please check the code after “The PHP side”.
Patrick.
Can you update the tutorial with instructions on how to remove a product from the cart? Little X next to the product which removes product from the cart with AJAX
And thank you. Used your tutorial, took a lot of playing around but did get it to work!
And one more thing, your variations in the cart dont work as they should. Old woocommerce code maybe?
I had to add
if(!product_id){
product_id = jQuery(‘input[name=”product_id”]’).val();
}
in the crispshop-single.js
and in functions i had to make a lot of changes also
Hi! Why then automatically added to two products.