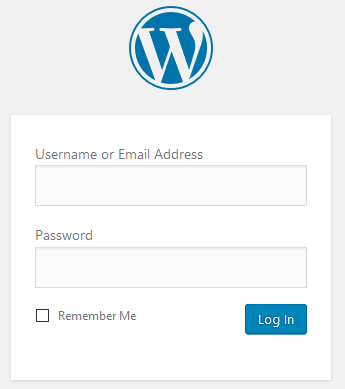
If you have been using WordPress, you must be familiar of the wp-admin login page, where you login to enter the dashboard or the user area of the website. The login page does it’s work but in terms of branding and a white-label solution, it doesn’t quite look good specially with the page showing nothing other than the form and the WordPress logo.
There are several plugins out there which can help you get a login form on any WordPress page. However, despite installing the plugin, you still have to do some work in styling the form according to your website design. If you are looking for a custom AJAX WordPress login form, then refer to the following code to get it up on your website.
Custom Ajax WordPress Login Form
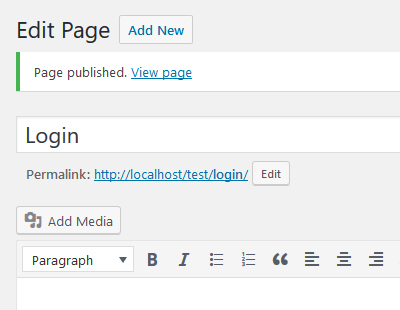
First we need to create a Page for the login form. Head over to Pages > Add New and create a page, name it Login or whatever you want the name to be and publish it.
After the page is created, copy the page.php file of your theme in a new file, add the following at the top of the page and then save the file in your theme folder with the name page-login.php or any other name you want.
<?php /* Template Name: Login Template */ ?>
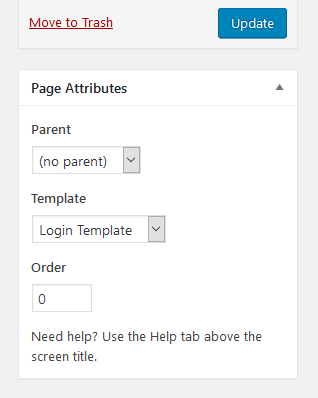
Once you do the above, go back to the login page, refresh the page if you are already on that page. Set the page template for this page in the Page Attributes section to the one you just created above.
Now we start creating the Custom Ajax WordPress Login Form. Remove the from the file. Now this may vary from theme to theme, you will have to figure out which is the section which outputs the content of the page. Additionally, you can also place the form code after the “content” call. This way you can write some custom text on top of the form.
The HTML
Every form needs the HTML, here is the simple HTML code for creating the form on your page.
<form action="#" id="login-form">
	<div class="message"></div>
	<div class="login-wrap validate">
		<label>Username</label>
		<input type="text" name="username" id="username" value="" />
		<span class="error">Username is required.</span>
	</div>

	<div class="login-wrap">
		<label>Password</label>
		<input type="password" name="password" id="password" value="" />
		<span class="error">Password is required.</span>
	</div>

	<div class="login-wrap">
		<div class="login-rem">
			<input type="checkbox" name="remember" value="true" /><span>Remember</span>
		</div>

		<div class="login-submit">
			<button>Login</button>
		</div>

		<div class="clear"></div>
	</div>
</form>
The span tag is used to display the errors after validation. Since it’s a login form, of course both will be required, so there’s validation to be done for both. The div with class “message” is used to display any error returned from WordPress, in case the user doesn’t exist or the password is wrong.
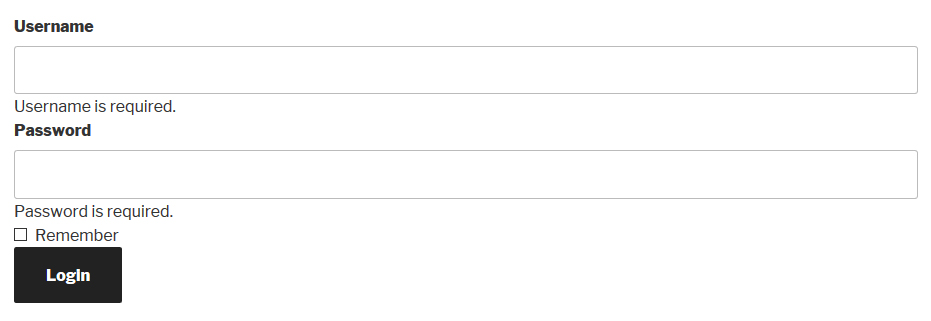
I am doing the above test using the default TwentySeventeen theme. Here is how the form looks like after placing the above code.
The TwentySeventeen theme and most themes already have the basic CSS for the forms. However, to make it look perfect we will add some CSS to match the styles of your website. I am going to use the colors of my website as the base and style the form according to that.
The CSS
.clear {
	clear: both;
}

.message {
	color: #ff0000;
	font-size: 14px;
	margin-bottom: 15px;
	display: none;
}

.message a {
	display: none;
}

#login-form {
	border: 1px solid #ccc;
	padding: 20px;
	max-width: 380px;
	margin: 0 auto;
	border-radius: 3px;
}

.login-wrap {
	margin-bottom: 20px;
}

.error {
	display: none;
	color: #ff0000;
	font-size: 14px;
	margin-top: 8px;
}

.login-rem {
	float: left;
	padding-top: 16px;
}

.login-submit {
	float: right;
}

#login-form button {
	background-color: #cf2228;
	position: relative;
	padding: 15px 50px;
}

#login-form button::after {
	background: url('images/ajax-loader.gif') no-repeat;
	position: absolute;
	width: 16px;
	height: 16px;
	content: "";
	top: 50%;
	margin-top: -8px;
	right: 15px;
	opacity: 0;
}
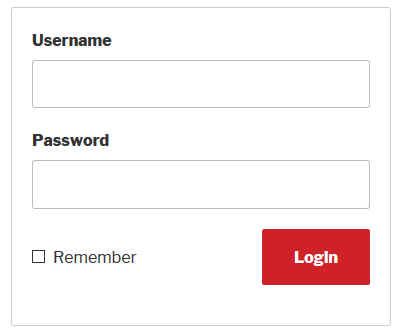
I have added the above CSS styles to a child theme of the TwentySeventeen theme. Make sure you add any custom CSS in the child theme. Here is how the form looks after adding the above CSS. The button:after has been added to display a loader while the form is processing.
Now that the HTML and the styling of the form is done. Let’s start doing the functional side of this form. The first thing we need to do is to validate both the fields and make sure that the user has entered both the fields.
Before starting off with the jQuery and AJAX part, we have to enqueue the JS file to the page so that we can define the functions there. Paste the following into the functions.php of your child theme.
function custom_login_scripts() {
	if (is_page_template('page-login.php')) {
        wp_enqueue_script( 'ajax-login', get_stylesheet_directory_uri() . '/assets/js/ajax-login.js', array('jquery'), '1.0.0', true );
        wp_localize_script( 'ajax-login', 'login_ajax_object', array( 'ajax_url' => admin_url( 'admin-ajax.php' ), 'home_url' => home_url() ) );
    }
}

add_action( 'wp_enqueue_scripts', 'custom_login_scripts' );
You can set the path to whatever you want. The wp_localize_script is used to load the admin-ajax.php file when we process the form and also redirect the user to the home page after successful login.
The JavaScript/jQuery
The following jQuery will check if both the fields are present. If they are not present, the error message will be displayed for the empty field.
jQuery(document).ready(function() {
    jQuery('#login-form').submit(function(e) {
		e.preventDefault();
		var errors = 0;
		jQuery('.message').hide();
		jQuery('#login-form').addClass('processing');
		jQuery(this).parent().find('.error').hide();
	    jQuery('#login-form input').each(function() {
			if( !jQuery(this).val()) {
				jQuery(this).parent().find('.error').slideDown();
				jQuery('#login-form').removeClass('processing');
				errors++;
			}
		});
	    if(errors == '0') {

	    }
	});
});
Now that the validation is done, it’s time to process the form and send the data to WordPress to do the login part.
Here is the code which will send an AJAX request to WordPress using the fields entered by the user.
jQuery(document).ready(function() {
    jQuery('#login-form').submit(function(e) {
		e.preventDefault();
		var errors = 0;
		jQuery('.message').hide();
		jQuery('#login-form').addClass('processing');
		jQuery(this).parent().find('.error').hide();
	    jQuery('#login-form input').each(function() {
			if( !jQuery(this).val()) {
				jQuery(this).parent().find('.error').slideDown();
				jQuery('#login-form').removeClass('processing');
				errors++;
			}
		});
	    if(errors == '0') {
	    	var username = jQuery('#username').val();
	    	var password = jQuery('#password').val();
	    	var remember = false;

			if (jQuery('#login-form input[type="checkbox"]').is(':checked')) {
				var remember = true;
			}

	    	jQuery.ajax ({
	            url: login_ajax_object.ajax_url,
	            type:'POST',
	            data:'action=ajax_login&username=' + username + '&password=' + password + '&remember=' + remember,

	            success:function(results) {

	            }
	        });
	    }
	});
});
After the AJAX request is sent to WordPress, we use the parameters passed in the function to log in the user using wp_signon()
function ajax_login_function() {
	$username = $_POST['username'];
	$password = $_POST['password'];
	$remember = $_POST['remember'];

	$creds = array();
	$creds['user_login'] = $username;
	$creds['user_password'] = $password;
	$creds['remember'] = $remember;
	$user = wp_signon( $creds, false );
	if ( is_wp_error($user) ) {
		echo $user->get_error_message();
	} else {
		echo 'success';
	}

	die();
}

add_action('wp_ajax_ajax_login', 'ajax_login_function');
add_action('wp_ajax_nopriv_ajax_login', 'ajax_login_function');
The parameters will be first collected into variables and then passed into the wp_signon() function. If there are error messages, they will be sent to the success function. However, if there are no errors, the user will be logged in and redirected to the home page.
Here is the completed AJAX code after the PHP part is processed.
jQuery(document).ready(function() {
    jQuery('#login-form').submit(function(e) {
		e.preventDefault();
		var errors = 0;
		jQuery('.message').hide();
		jQuery('#login-form').addClass('processing');
		jQuery(this).parent().find('.error').hide();
	    jQuery('#login-form input').each(function() {
			if( !jQuery(this).val()) {
				jQuery(this).parent().find('.error').slideDown();
				jQuery('#login-form').removeClass('processing');
				errors++;
			}
		});
	    if(errors == '0') {
	    	var username = jQuery('#username').val();
	    	var password = jQuery('#password').val();
	    	var remember = false;

			if (jQuery('#login-form input[type="checkbox"]').is(':checked')) {
				var remember = true;
			}

	    	jQuery.ajax ({
	            url: login_ajax_object.ajax_url,
	            type:'POST',
	            data:'action=ajax_login&username=' + username + '&password=' + password + '&remember=' + remember,

	            success:function(results) {
	            	if (results == 'success') {
	            		window.location.href = login_ajax_object.home_url;
	            	} else {
		                jQuery('.message').html(results);
		                jQuery('.message').show();
		                jQuery('#login-form').removeClass('processing');
		            }
	            }
	        });
	    }
	});
});
Please share the article with your friends if you liked it. And also feel free to comment or ask anything you want.
Cheers!